
Overview
Important: This page does not apply to KORE Sponsorship users. Your assets (inventory) are managed in the CRM module and automatically imported into Activate.
Assets are an essential component in Activate—you can't have a deal without anything to buy or sell. Any Team Member can add assets to the system. Rights holders typically enter all the assets they plan to sell. Sponsors that subscribe to Activate add just those assets they have purchased (or plan to purchase).
Bulk add for new clients
Caution: If you have already added any assets to Activate, you cannot use the workbook provided here. Contact your KORE Success Manager to request a workbook specifically for your organization.
When you first sign up for Activate, adding all of your assets through the web app might seem daunting. You can instead create an Excel sheet listing all of your assets. The KORE Support team will be happy to import them into Activate for you.
Download our Activate Assets Import workbook to get started. In the Assets worksheet (aka tab), columns A through D are for KORE's use—do not enter anything in them. In column E onward, provide the details for each inventory asset you wish to add.
In the Divisions, Categories, Products, and EventCategories worksheets, enter each name you used in the Assets worksheet into column A. (For example, open the Categories worksheet and add rows for Hospitality, Digital Signage, etc.)
Do not change the RatecardType worksheet. It is pre-populated with the only valid rate card types: Seasonal and Bank.
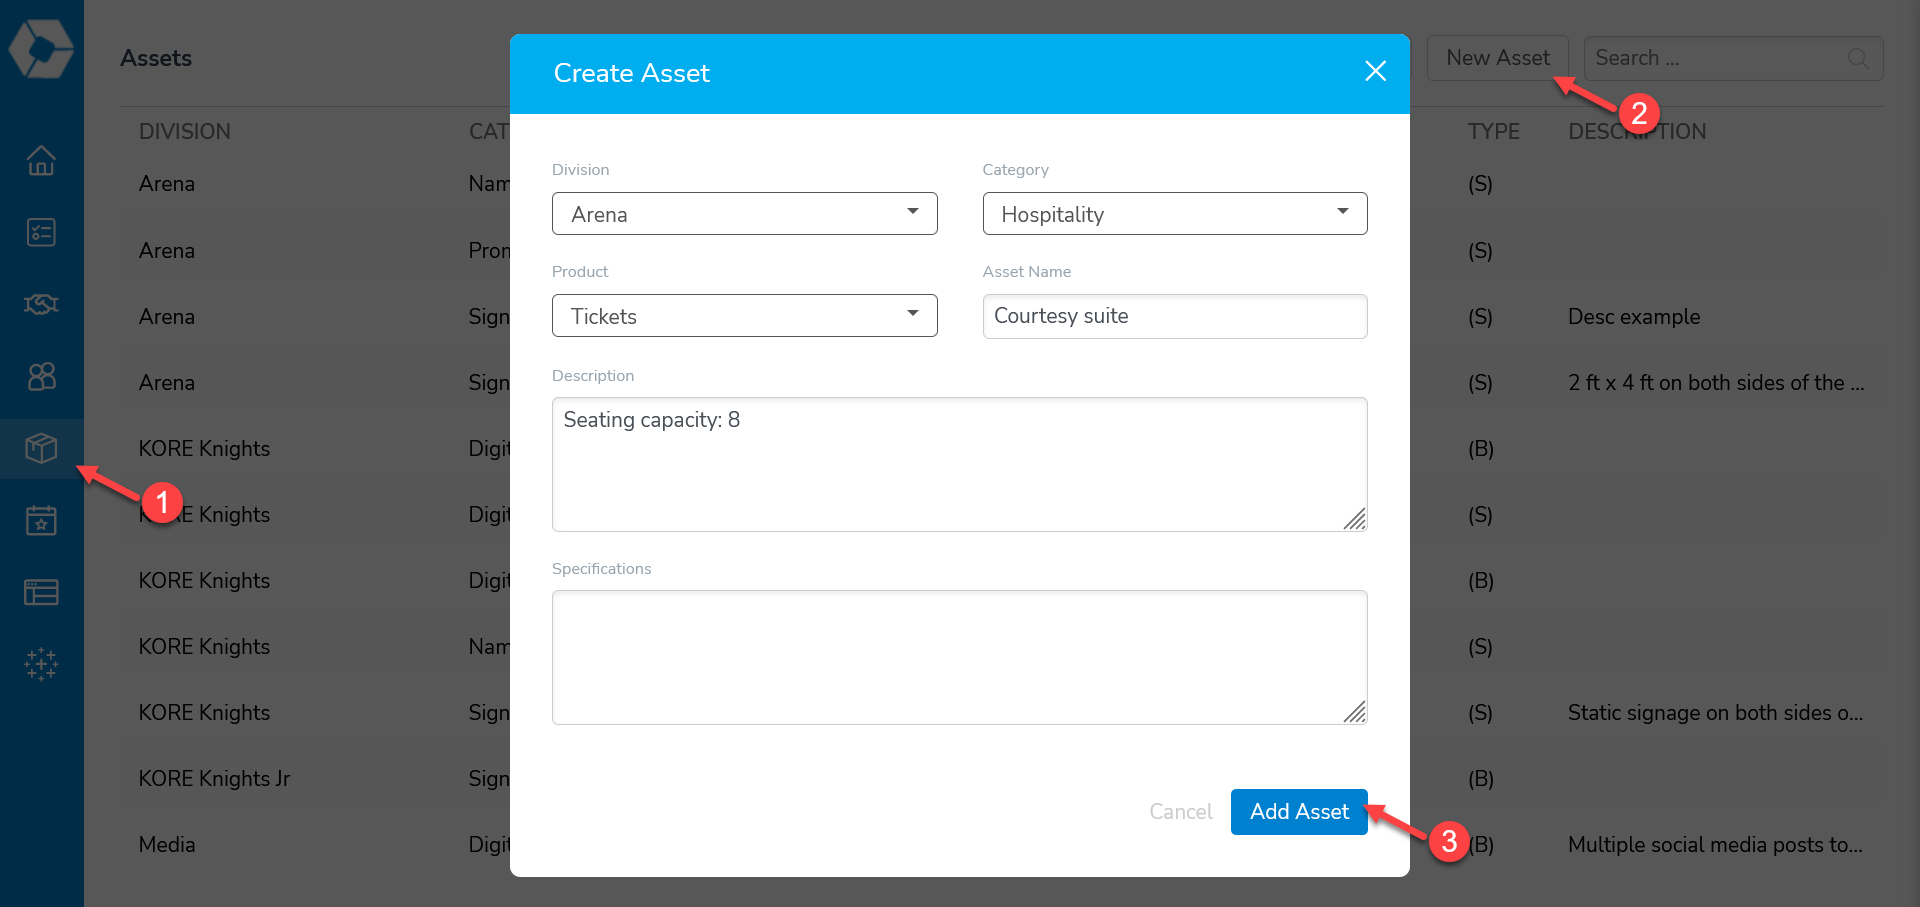
Add a new asset
Whenever you need to add a new asset, follow these steps:
- Select the Assets icon in the navigation bar.
- Select the New Asset button.
- Select a Division, Category, and Product for the new asset from each drop-down list.
If none are suitable, select the Add new Division / Category / Product item in the drop-down list, then enter a name for it in the text box. - Enter an Asset Name.
- Optional: Enter text in the Description and/or Specifications boxes for your team to reference.
- Select the Add Asset button.
Upon adding the new asset, Activate will display the asset details window. Here, you can add additional information. The details in the Seasonal Info section will only apply to the selected season, but can be rolled over into another season.
- Optional: Select the + button next to Event Categories, then enter one or more categories for this asset. (Some organizations disable event management, so this may be unavailable.)
- Select the desired season from the drop-down list.
- Select the Type of asset: Seasonal or Bank.
- Enter the Total Availability (quantity) for this asset.
- Optional: Enter the Rate (selling price) and/or total Cost (price) to your organization for this asset. (Admin users can disable the Rate field in Setup > System Configurations > Deals > Deal Asset.)
- Optional: Enter a Unit of Sale Description for this asset. Most commonly used for time-based assets (like 15 second ads).
- Click the Save button when finished.

Editing an asset
An asset can be edited either from the Assets page or from a Deal page connected to the asset. Use the Assets page to make changes for future instances, or the Deal page to make changes specific to that deal.
Assets page
On the Assets page, find the asset in the list and click on it. The asset details window will open, allowing you to make changes. Changes to the selling rate or unit cost will only apply to new instances—existing deals will continue to show the selling rate and cost that were in effect when the asset was added. When finished, select the Save button at the top.
Deal page
If an asset has been added to a deal, you can edit an instance of it connected to a particular Deal. Navigate to the Deal page and select the Assets tab at the top and then select an asset from the list. The assets detail window specific to the deal will open. This window also contains fields that are specific to the deal, such as Internal Remarks and Tasks. When finished, select the Save button at the top.
The internal remarks text box is visible only to team members (internal users). Any external users you invite to collaborate on a deal will not be able to see this field.