
Overview
In this tab, you'll assemble the list of assets your sponsor will receive. You'll also record the rate and revenue details. This is where the bulk of the work happens in the Deal Manager.
Tip: Click the Save Changes button frequently to ensure you don't lose any work if your CRM session expires or your computer/browser crashes. This saves the deal as a "draft deal sheet", including the cart contents. Nothing will be locked in or sent for approval at this stage—you can continue editing the deal sheet with the option to remove items previously added to the cart.
Deal value
Most sponsors have a set budget for their deals. The top half of the Inventory tab helps you track the value of assets relative to that budget.
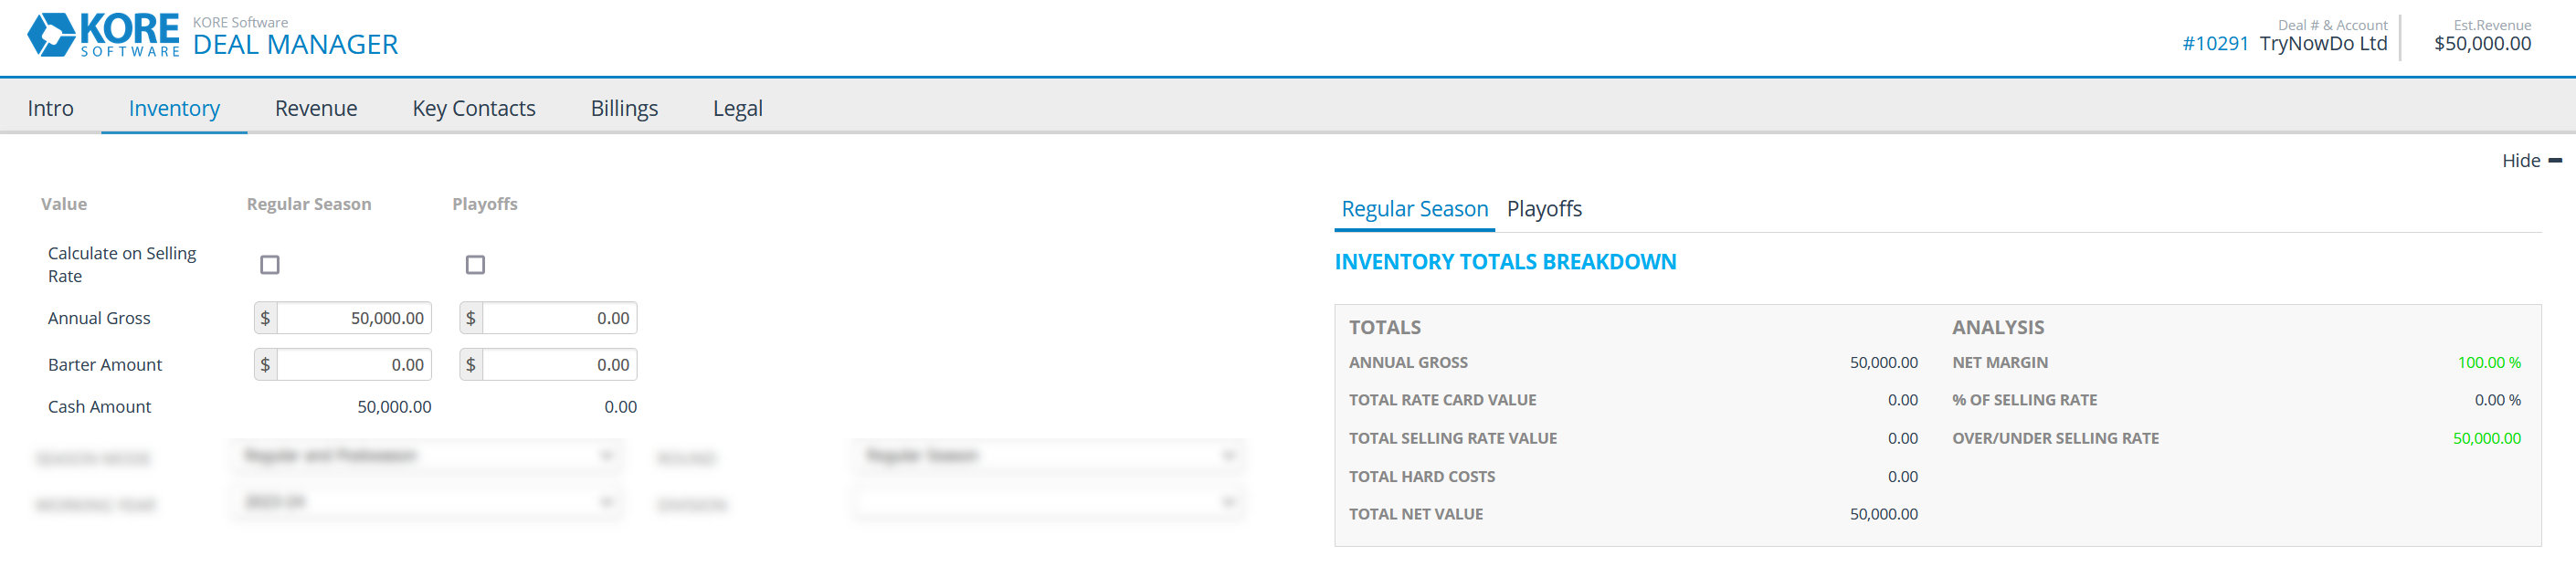
If you entered the first season gross in the Intro tab, it is automatically applied to the Annual Gross field here. Alternatively, you can check the Calculate on Selling Rate box to automatically tally the Annual Gross as you add inventory to the deal.
After adding inventory to the deal sheet (described below), you can use the checklist icon (next to the Calculate on Selling Rate checkbox) to view or change how the deal's revenue will be divided between different divisions. This is available regardless of whether the Calculate on Selling Rate checkbox is selected.
If the sponsor will provide in-kind assets to you, enter their value per season in the Barter Amount field. (You'll be able to list the sponsor's obligations later in the Legal tab.)
As you add inventory to the deal sheet, the Inventory Totals Breakdown section will automatically update. In the Totals column, you can compare the sums of your actual selling rates against the default prices. You can also view the actual value of the deal to your organization after deducting hard costs you incur to deliver the agreed upon assets.
In the Analysis column, you can view the net margin—the percentage of the annual gross that your organization will keep after paying for hard costs. If you have not checked Calculate on Selling Rate, the Analysis column also shows how the annual gross compares to the sum of selling rates and how much the sponsor would overpay or underpay. (If you did check the Calculate on Selling Rate box, by definition there can be no difference.)
Season mode and round
First, select the season mode from the dropdown list. Most deals are for either the regular season or the postseason alone, but you can create a deal sheet with assets for both.
Next, choose the round to add inventory for. If you selected the season mode "Postseason" or "Regular and Postseason", you must add inventory for each round separately—after adding inventory for one round, change this dropdown selector to the next round and go through the same process of adding inventory (described below).
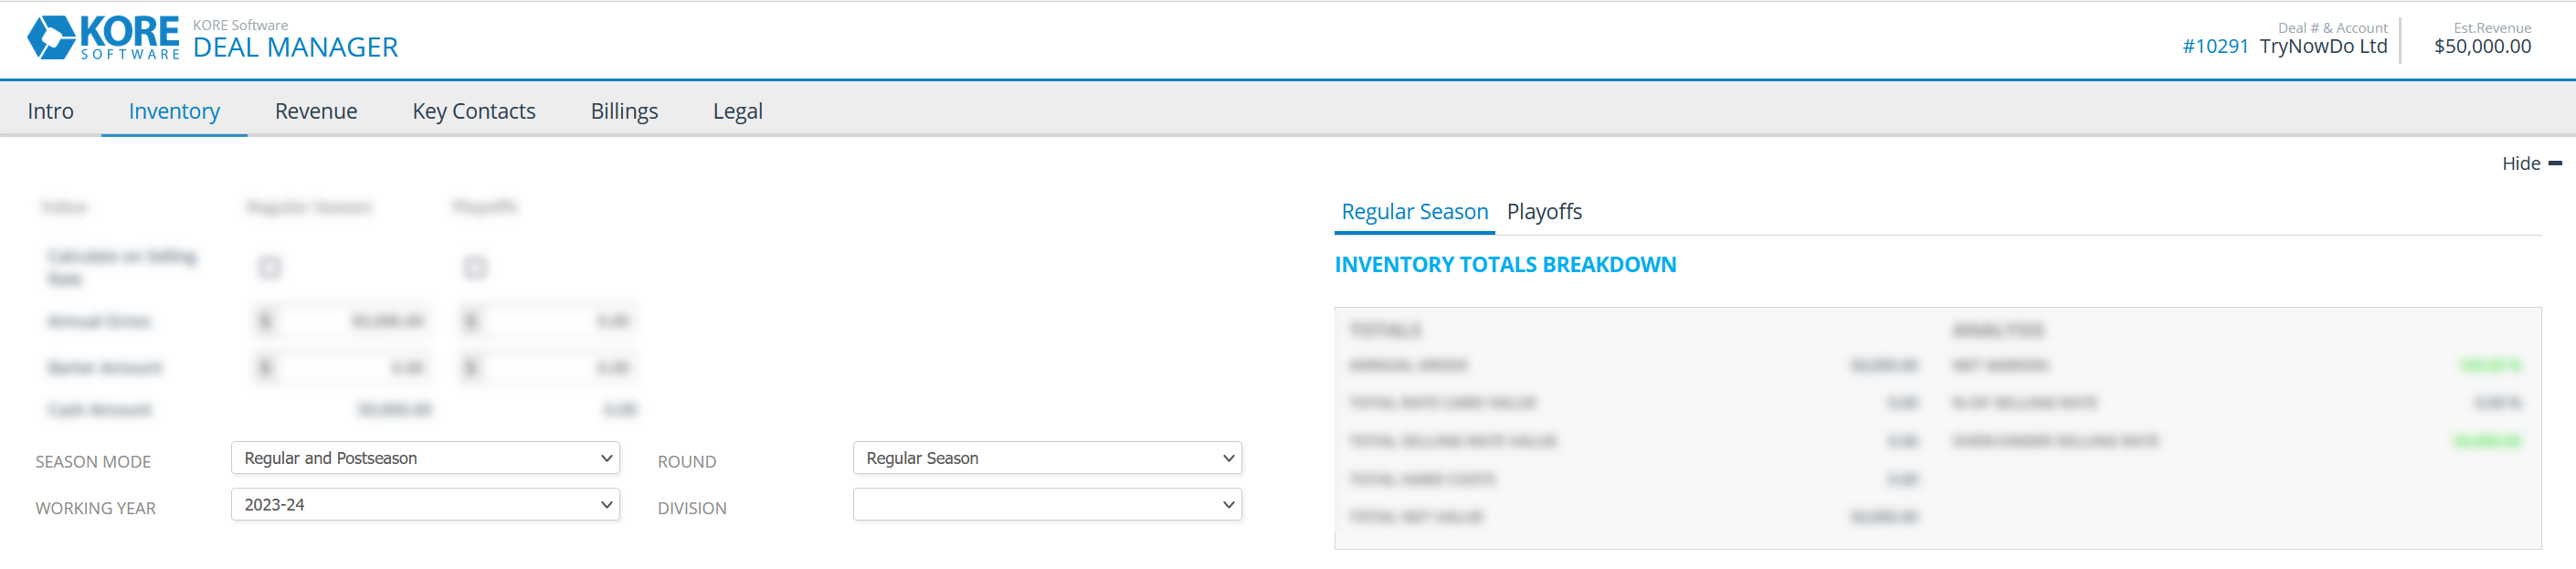
Working year
The working year represents the season you're currently adding inventory for, usually the first season of the deal.
For the majority of multi-season deals where the same assets will be provided each season, salespeople typically enter inventory for just the first season. Org admins later use the deal sheet rollover tool to add inventory to the deal for the following season. That tool lists all deals which include a given season but have no inventory allocated for it. The escalation fields in the Revenue tab will allow you to specify selling rate increases for future seasons, so you can sell inventory for future seasons before rate cards have been created.
If you are selling a multi-season deal which will have different assets in a future season (for example, if the team is moving to a new stadium with different signage options), an org admin must first create the inventory and rate cards for that season. After entering the inventory for the first season of the deal, you can then change the working year field to the season where the assets will change and add inventory to the cart separately from the earlier season. Your org admin can still use the deal sheet rollover tool in these cases: if the first three deals use the same inventory, you only need to enter inventory for the first season even if different assets will be sold for the fourth season. Likewise, if the fifth season will use the same assets as the fourth season, you don't need to enter the assets separately since they can be rolled over from the prior season.
Tip: To avoid overselling inventory for a future season, always ensure all existing multi-season deals have been rolled over into that season before creating new deals beginning in that season. There is an assumption here that your inventory will either be the same or grow in future seasons—in the rare cases where your available quantity of an asset will decrease (for example, if a concourse will be closed for remodeling during an upcoming season), the system cannot guarantee that the asset won't be oversold in multi-season deals that roll over. Org admins should work directly with their sales staff to plan for this (such as agreeing with sponsors that the asset might be replaced by something else that season).
Division and categories
Inventory items are organized into divisions, categories, and products. Use this dropdown selector to choose a division to select inventory from. The Deal Manager will then show the various categories within that division as tabs. Select a tab to view the inventory items it contains. Alternatively, you can enter a term like "sign" into the inventory search box.
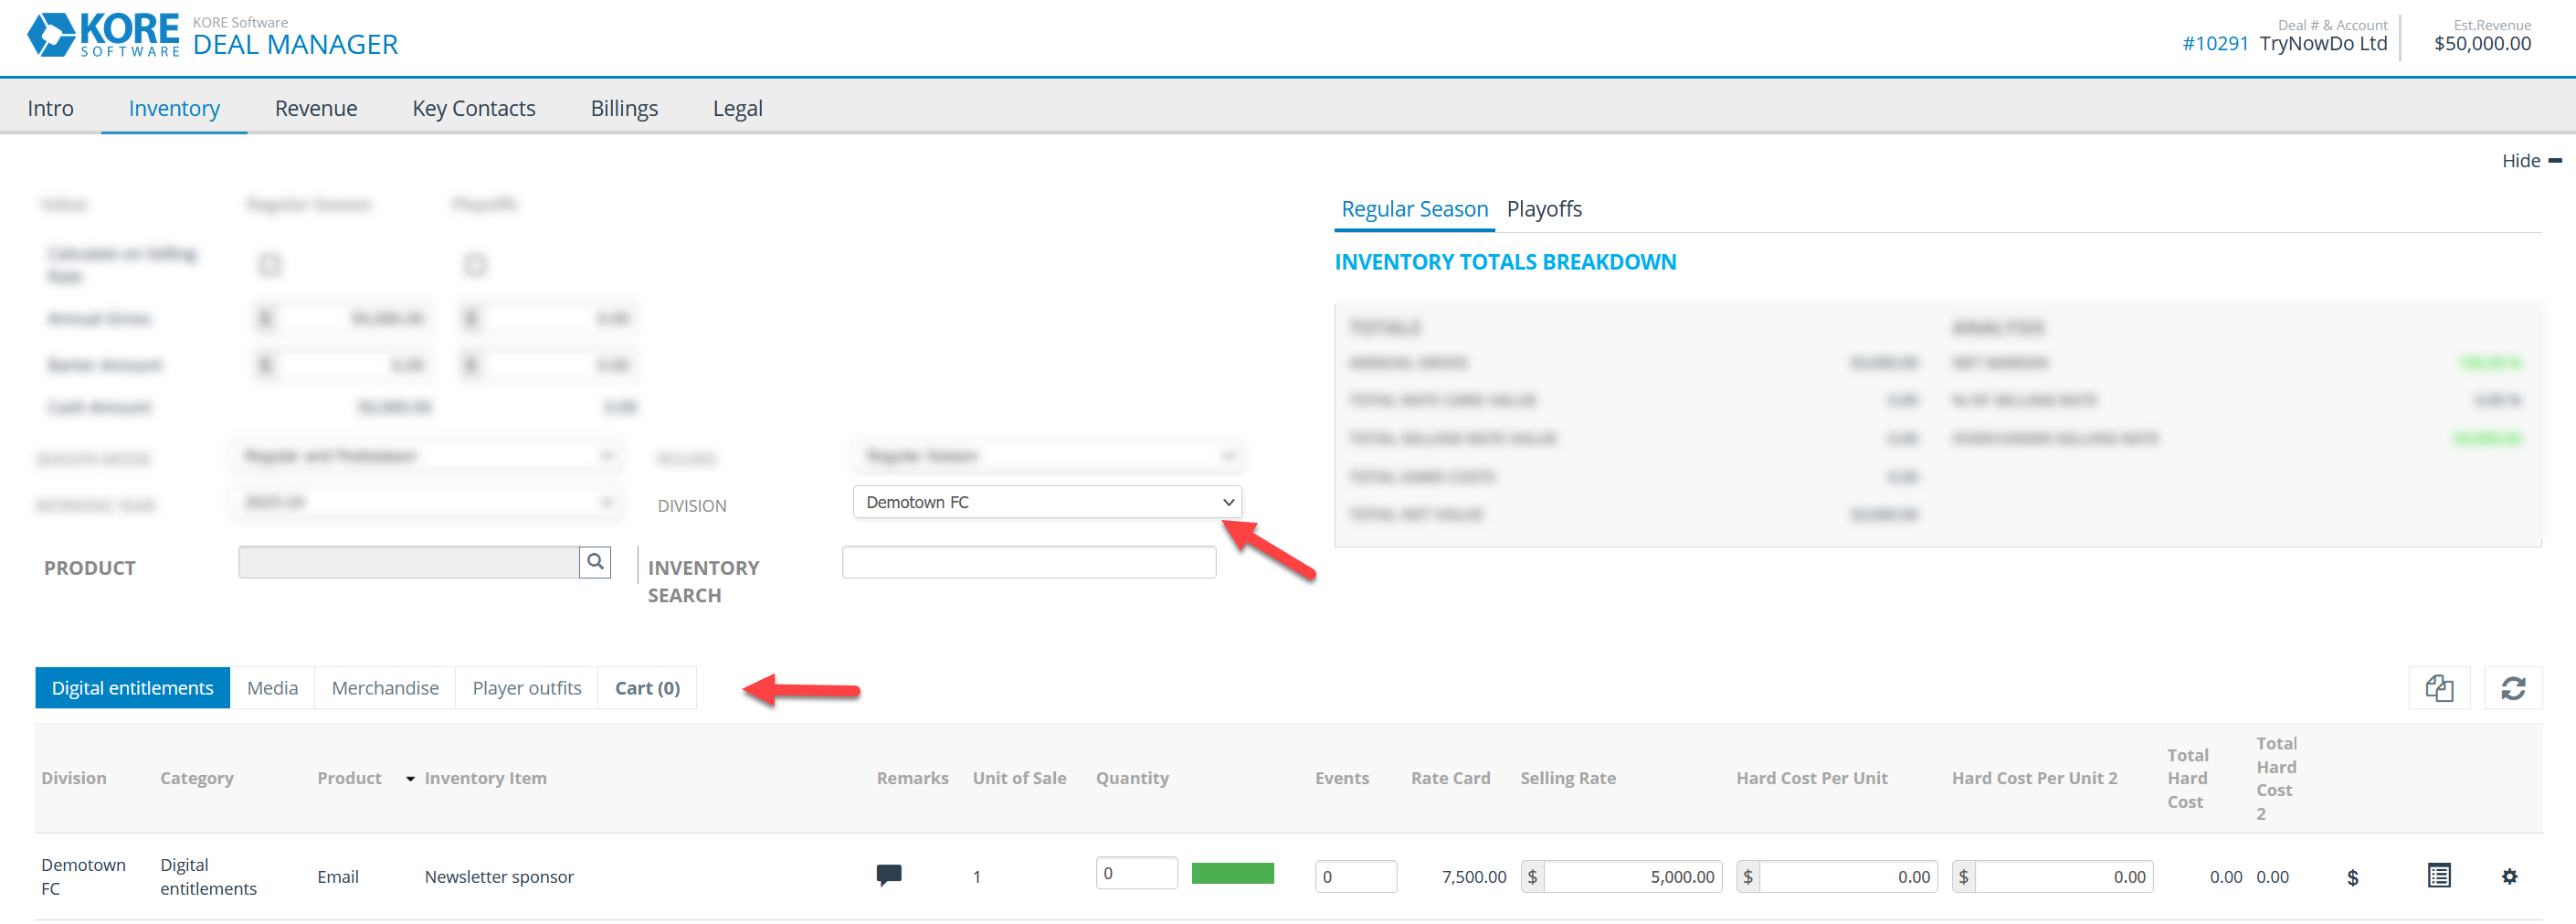
Inventory grid
Here, you can choose which assets to include in the deal. Technically, you are selecting rate cards—if the same asset has more than one rate card for the given working year (e.g., a seasonal rate card and an individual rate card), the grid will show the asset on a separate line for each rate card.
Browse the list of assets and enter the desired quantity for each asset to sell. For non-commodity assets, click the availability bar to see how many are still available and how many of those haven't yet been pitched to other sponsors. You can also use the speech bubble icon to add remarks specific to this line item of the deal sheet; the icon will be in color if any remarks have been added.
If you select an individual rate card (rather than seasonal or bank), the quantity applies per event, and you must also enter the number of events to deliver that quantity at.
The Rate Card column shows the default price for the asset. If allowed by your organization, you can override this in the Selling Rate column. You may also be allowed to override the Hard Cost Per Unit depending on your organization's settings.
At the end of each row, there are three icons. The first ($) indicates whether the item is eligible for proration. Click the second icon (checklist) to view the item remarks, if any—these are separate from the line item remarks you may have added previously. The third icon (gear) opens the inventory details for that item in a new browser tab or window.
Troubleshooting: If you enter a quantity but the box in the Events column turns red and says "Value must be less than or equal to zero", this usually means that no suitable event list is associated with that item for the current working year (or the event list contains no events). Click the gear icon at the end of the row to open the inventory details, then scroll down to the Event Lists section to confirm. Depending on the permissions settings, you or an org admin can add a suitable event list.
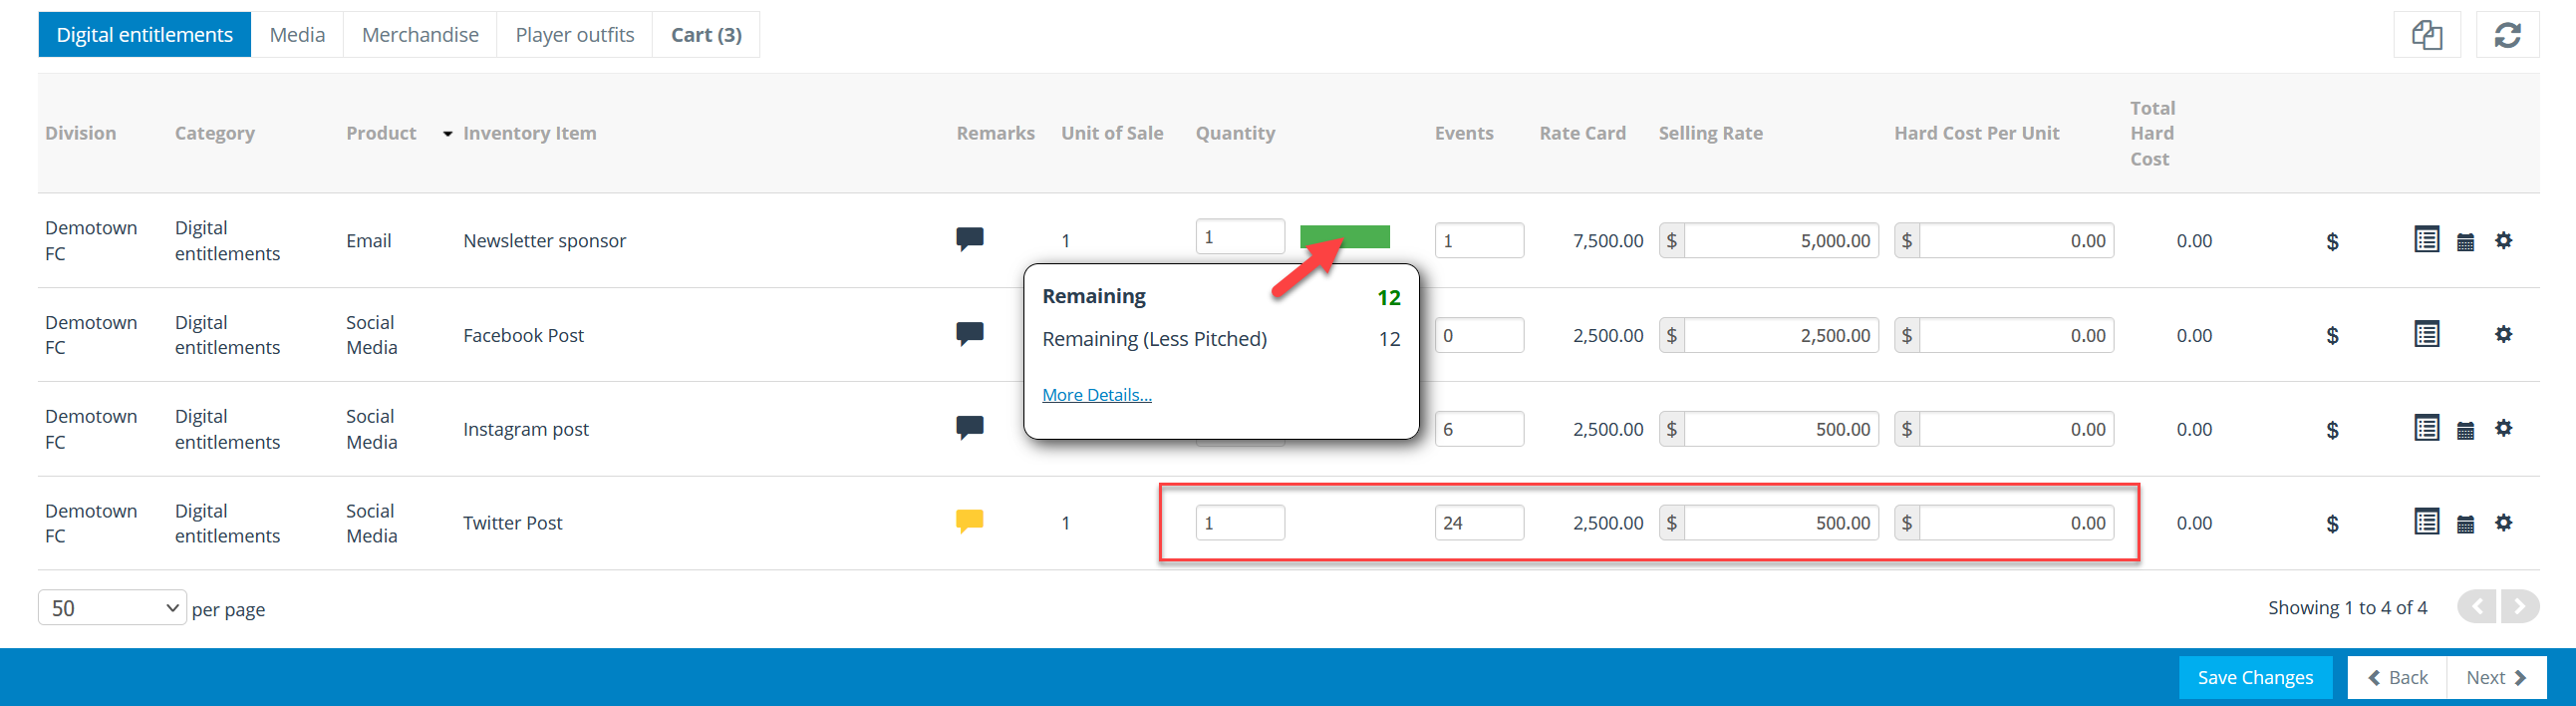
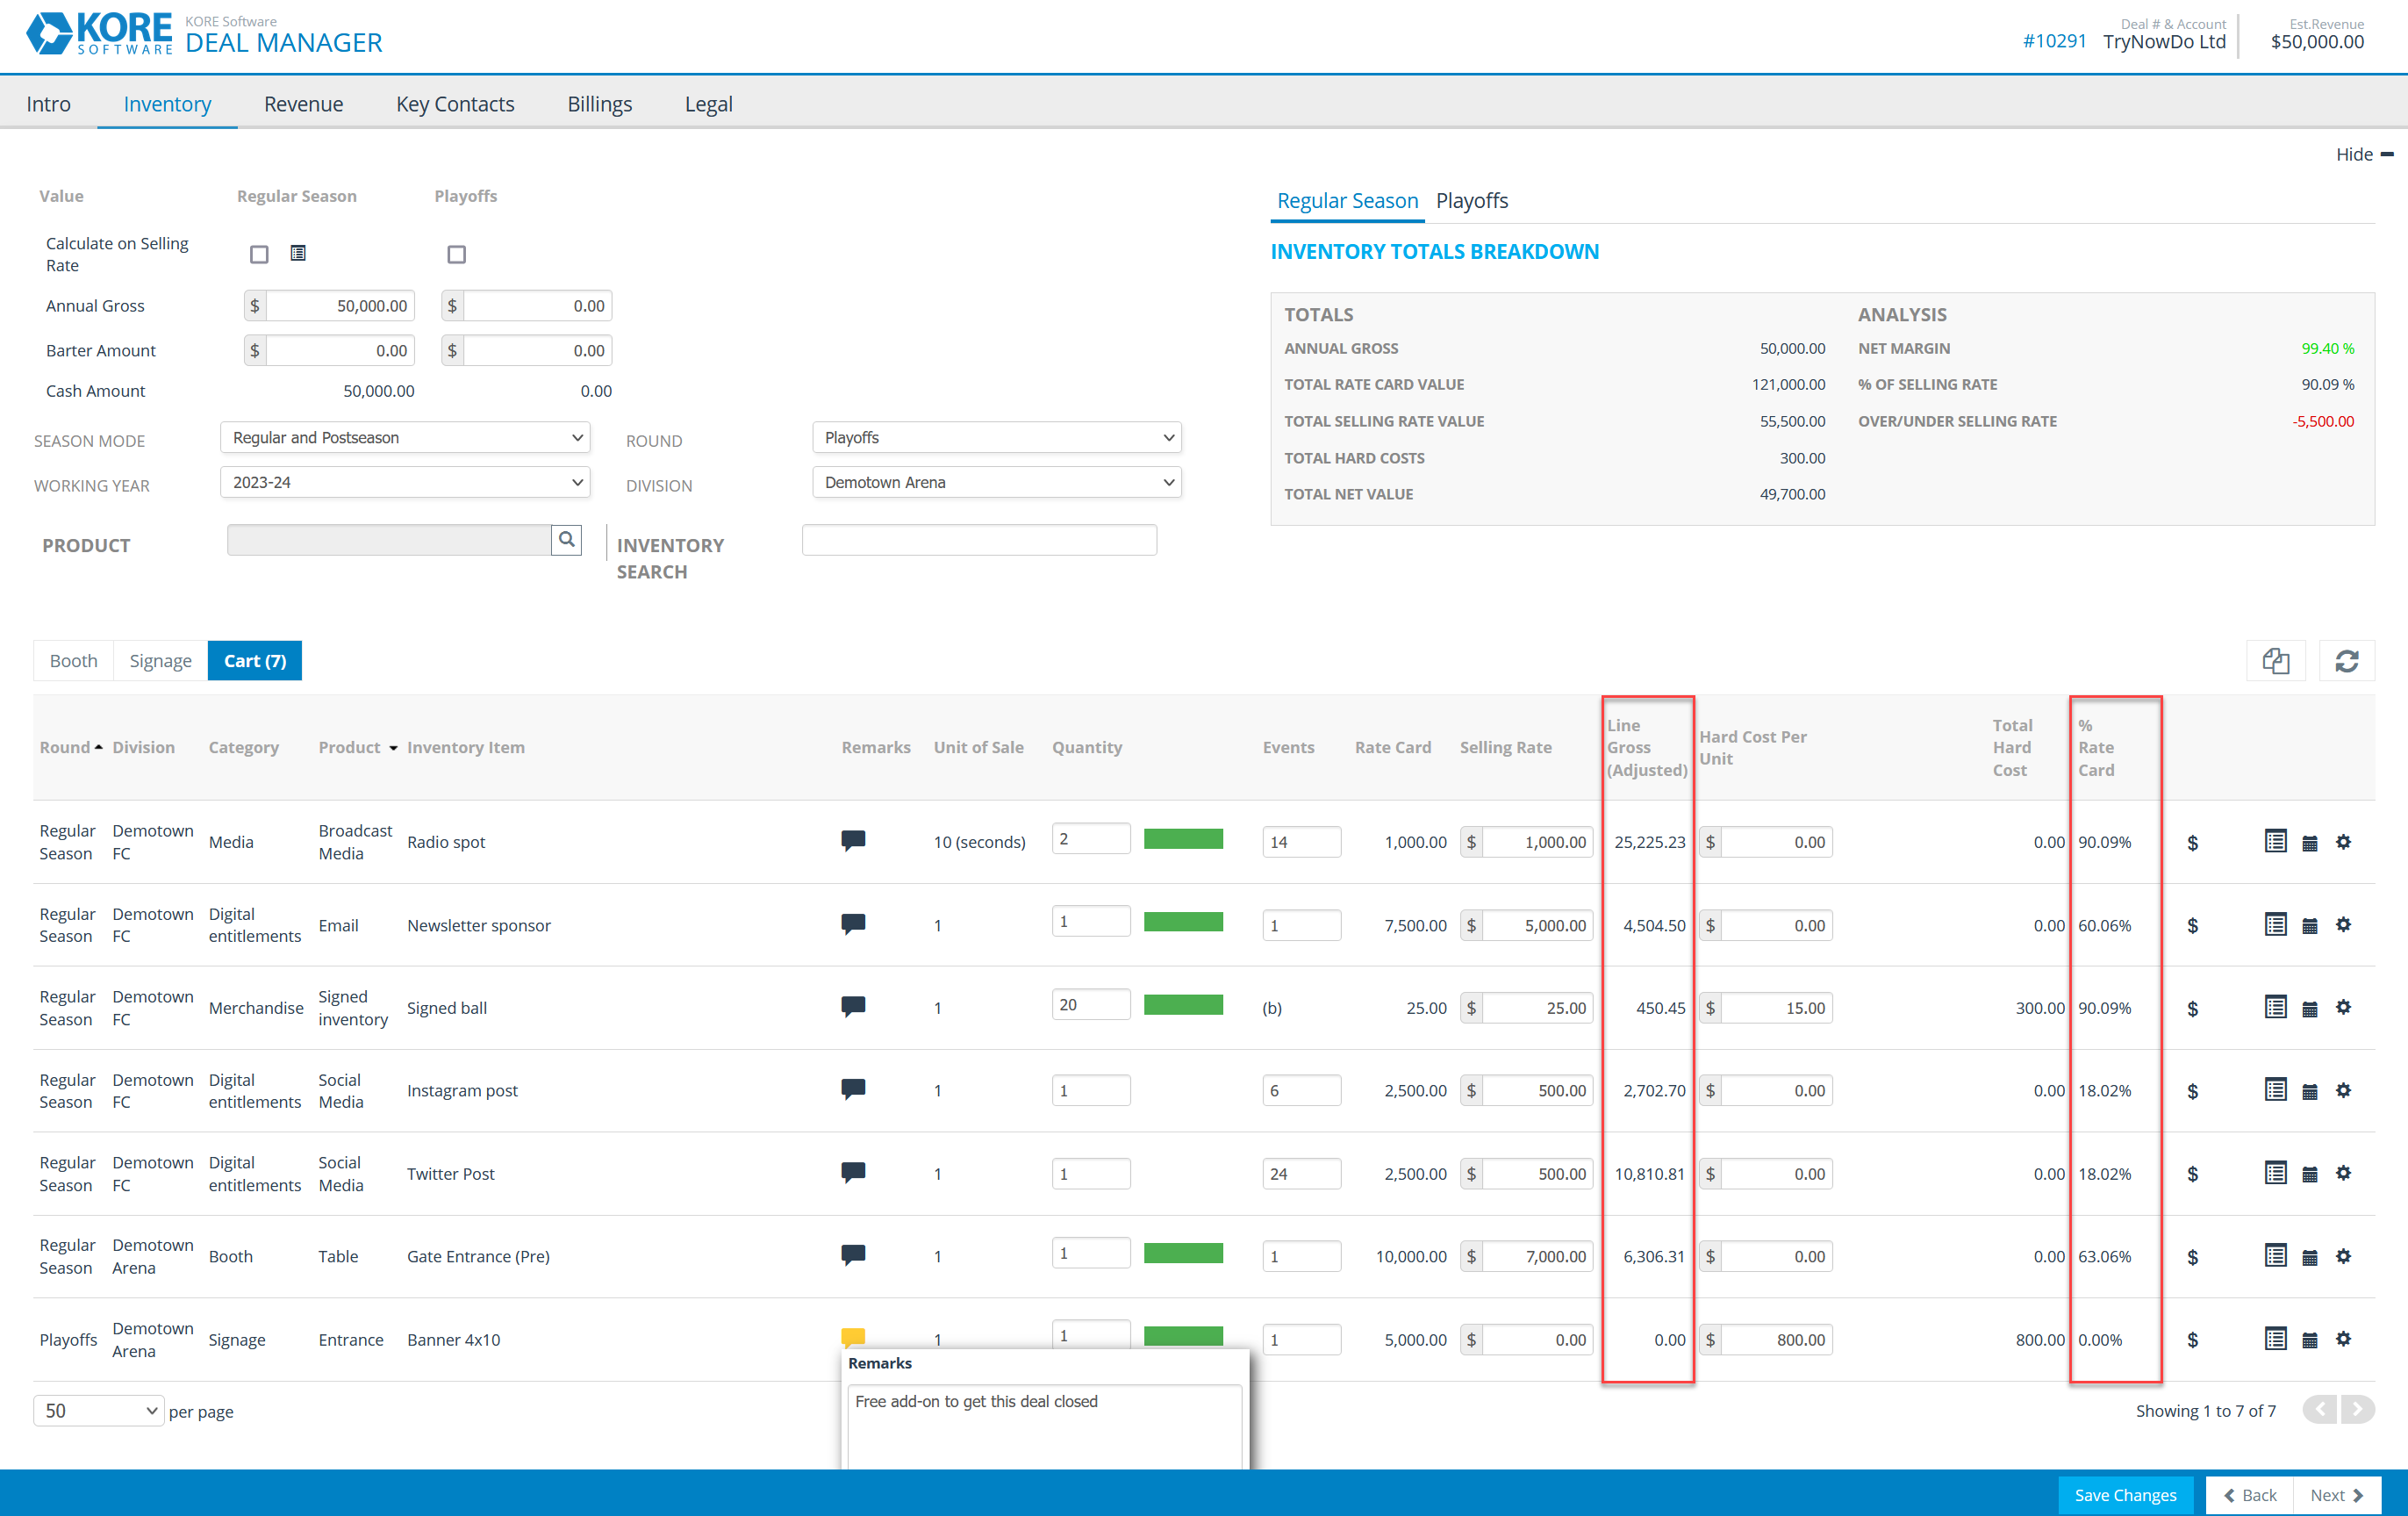
Cart
After adding inventory to the deal sheet, the items are listed in the Cart tab. This displays all assets included in the deal for the selected working year, regardless of the selected division or round. This part of the inventory grid includes two additional columns: Line Gross (Adjusted) and % Rate Card.
The Line Gross (Adjusted) column shows the total amount of the sponsor's overall budget allocated to this asset. This is initially calculated for each row as quantity × events × selling rate. If you are not using the Calculate on Selling Rate option, the amounts in this column are then adjusted proportionally so they add up to the annual gross.
The % Rate Card column shows what percentage of the full price you are selling the asset for. If this percentage is low and you aren't purposely offering a major discount, double-check the row for typos. Consider adding remarks to explain any unusual circumstances.
Don't forget to use the Save Changes button to ensure your work is safe.